Behind the Scenes: Creating an Interior Design Concept

Imagine the feeling of walking into a home designed just for you. It’s a sea of colors you like, fabrics that feel effortlessly elegant and comfortable, and spaces designed just for your family to relax and connect. It feels like… home.
Now imagine that you get to wake up to that space every day! That is the power of interior design. It elevates the way you live, making everyday life special. So, how do we get from the space you currently have to this fresh, welcoming home? It all starts with a Design Concept & Plan…
What’s a Design Concept?
The success of your home renovation depends on how well thought-out the Design Concept is, from the space plan to the finishes to the furnishings that will eventually make your house feel like home.
In other words, the conceptual design phase is the starting point of our creative work. It is a thorough process that requires a high-level of attention to detail, deep creativity, and a thoughtful, personal vision.
But instead of telling you, let me show you how the process works…

Phase 1: Discovery
Discovery Call
The first step is our Discovery Call. It is a brief, introductory phone call where we discuss your project and determine if we are a good fit for each other. If our services and aesthetic align with your project, we’ll schedule your consultation.
Consultation + Project Launch
The consultation is a much lengthier session than our Discovery Call. Together, we’ll deep dive into everything you’re dreaming of for your home. We usually meet at the project site, or via Zoom (thanks, COVID), and together, we will discuss all the details about your space:
What you like and dislike about it
What you envision for the new space
Who will be using the space and how you intend to use it
If you have kids or pets (so we can family-proof your furniture, if needed!)
Your desired investment level
Your project timeline
You style preferences and more…
These questions help me understand your lifestyle. I’ll use these insights to create a space that functions well for how you live now — and how you want to live in the future.
As for style, a good place to start is with inspirational images. If you have any Pinterest boards, Houzz boards, or clippings from design magazines, I would love to see them. I will also ask you to browse through my portfolio and share which images or design elements stand out to you and why. We can adapt any design features you love in a way that’s wholly unique to you.
Using these insights, I’ll create a Project Proposal for you. Once signed, your project is officially launched.

Phase 2: Design Direction
After the consultation, I have a pretty good idea of what your design project will entail. Now, it’s time to get creative and set the design direction for your space. Cue the fun part…
Space Planning
I always start with space planning and work on an initial floor plan. This helps me select the right furniture for your space such as what size they need to be and how many pieces you’ll need. I also ensure the flow throughout the space is optimal and we have the right amount of space for the traffic patterns.
Design Concept Creation
Once the space plan is set, I’ll start creating a Design Concept, which is a conceptual mood board or first “draft,” as I call it. This is simply the starting point that will become the foundation of your official Design Plan in Phase 3. The Design Plan itself takes many hours — and parsing through thousands of products — so we have to make sure we agree upon the direction first.
Conceptual Design Meeting
During this meeting, we will discuss the layout of your space in more detail. We’ll talk about furniture, lighting, textures, patterns, color palette, and pretty much every design aspect of the project. The mood board comes in really handy at this stage of the process, because you will have plenty of visuals. Based on your feedback, we’ll make edits and officially solidify the design direction.
Example: This home is a great example of illustrating the process. When I came on board, this Los Altos Home was newly built for a family with 2 young children. The goal was to transform the empty home into a polished and inviting family space.

Floor plan complete!
Phase 3: Design Plan
Ah, the Design Plan. The most intense part of our process. This is the part that most people don’t see and don’t realize how much work goes into it, so welcome behind the scenes! After we conclude our Conceptual Design Meeting, I will start creating a more detailed Design Plan which includes sourcing specific furniture and decor.
Getting Inspired
For the Design Plan itself, my personal process starts with an inspiration, and it can come from anywhere. Sometimes it’s a furniture piece, or a rug, or a piece of art. It could be wallpaper, a fabric, or a particular style of sofa. Sometimes it’s more abstract, like a color palette or a look we want to achieve, or the feeling I get from the client. Usually, there is a subjective and emotional feeling to it like, “Oh, I think this would be perfect for this project.” This is where my creative brain takes the wheel.
Curating Options
Once I have the inspiration I’ll look at a lot of options, and I mean THOUSANDS of items, to find what speaks to me. One thing I do differently than other designers is I do not have a finite list of vendors that I source from. I don’t limit the design up front to a small list of vendors. For any given project, I often source from 20-30 vendors. Sometimes I fall into the perfect pieces for a project because I was casting a wide net, so to speak.
With the vision and inspiration in mind, I then collect and curate lots of furniture and decor options. For a living room I might look through hundreds of chairs, then I might pull in 5, sometimes 10 options or more. Then, these get pared down again…
Creating the Design
With the selectively curated options I start to really hone in on the final design. Much of it is digital work. I import images and bring in, replace, and move around furniture items and other components until a design starts to come together. I always have a vision in mind of what the bigger picture will look like, so I keep curating and honing options until that image feels complete. (Welcome to the mind of an interior designer.)
Once I’ve narrowed down the options, I order samples and swatches. Feeling the material in person, or seeing the color tone in a different light, is what really allows me to validate the final design, or make another edit. This is also why this part of the process can take weeks. It’s intense!
Sometimes, even after browsing through thousands of furniture pieces, I may not even find what I’m looking for. That’s when I consider custom made furniture, which I’ll bring into the conversation with you. Which brings me to...

Remember that home I introduced you to above? Here’s the Design Plan with all the selected furniture, color palette, and decor.
Phase 4: Design Plan Presentation
Once I put the Design Plan together, we’ll schedule a meeting for the presentation. The Design Plan consists of a digital board of the recommendations and alternative options, along with the quoted price of each piece. I’ll also bring all samples and swatches to the meeting, in order to give you a good visual and feel for the fabrics, paint colors, finishes, tiles, hardware, etc.
This is the time where you can share your feedback with me and tell me how you feel about the selection. We can make any edits based on your feedback, and if the changes you want are significant, I may revise the design plan and resend it to you until we agree on all furnishings and materials.
Of course, the next step is bringing the Design Plan to life, which you can read more about here. For now, I’ll just share the beautiful results of the Los Altos Project...

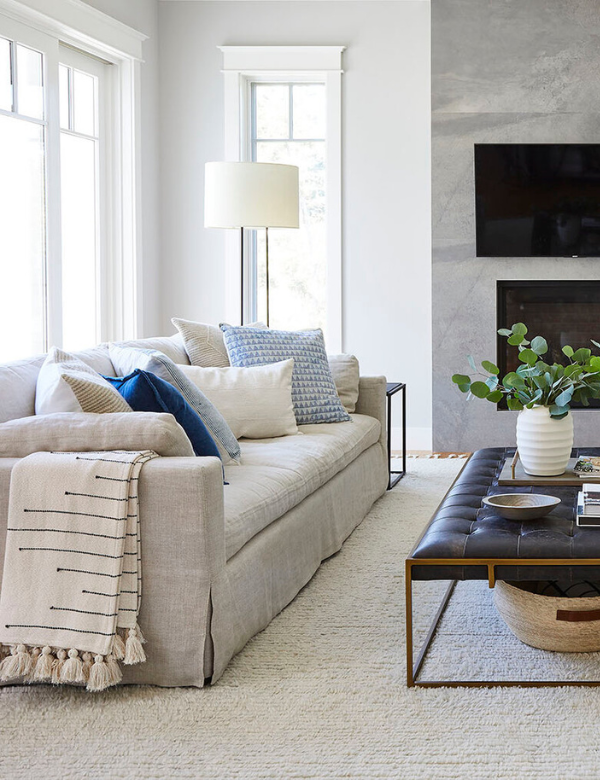
Design: Memmo Interiors / Photography: Laura Flippen
The final result was amazing! We created a modern and timeless living room. The space feels elegant yet casual, with everyday beauty and comfort for this wonderful family.
Again, you may not see the whole process with your own eyes, because a lot of the thoughtful design work happens behind the scenes. The key to a great design? Strategic and creative planning.
If you’re ready to create a beautiful and personal space that will elevate the way you live, reach out to me for a complimentary Discovery Call. I can’t wait to meet you.
Talk soon!
Rosanna